Showing posts with label WIN XP. Show all posts

April 17, 2015

Wallpaper Enable-Disable Trick for Win XP

You can easily restricted someone to change wallpaper in Windows XP with following registry keys.


1. Restrict Wallpaper

Windows Registry Editor Version 5.00

[HKEY_CURRENT_USER\Software\Microsoft\Windows\CurrentVersion\Policies\ActiveDesktop]
"NoChangingWallPaper"=dword:00000001

2. Restore Wallpaper

Windows Registry Editor Version 5.00

[HKEY_CURRENT_USER\Software\Microsoft\Windows\CurrentVersion\Policies\ActiveDesktop]
"NoChangingWallPaper"=dword:00000000

November 13, 2008

Defragment on Right Click


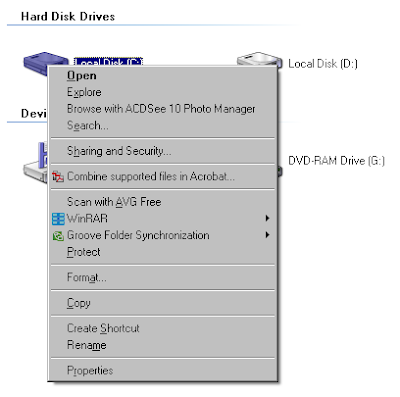
I posted lots of tricks on registry. This is another one. If you want to add Defragment option on your context menu then just use this trick. "The process or reorganizing and rewriting files so that they occupy one large continuous area on your hard disk rather than several smaller areas its called Defragmentation." You can also add Defragment on right click of mouse with help of following simple steps.


Add Defragmant:
Type following text in notepad or copy-paste it and save it with .reg extension. Then simply run/merge it. It will add Defragment option on right click of mouse.

Windows Registry Editor Version 5.00

[HKEY_CLASSES_ROOT\Drive\shell\runas]@="Defragment"
[HKEY_CLASSES_ROOT\Drive\shell\runas\command]@="defrag %1 -v"


Remove Defragmnet:
Type following text in notepad or copy-paste it and save it with .reg extension. Then simply run/merge it. It will remove Defragment option on right click of mouse.

Windows Registry Editor Version 5.00

[-HKEY_CLASSES_ROOT\Drive\shell\runas]

September 13, 2008

NTLDR Trouble

I handled an issue regarding NTLDR missing error on system boot up. The NTLDR is boot loader for Microsoft Windows (specially NT based operating system) and known NT Loder. The NTLDR runs from Primary HDD, USB Drive, CD-ROM too. It is booting system file so once its corrupted then it won't let you load/boot your operating system. Please check some reasons to corrupt NTLDR.
  • Boot priority/sequence changed
  • Due to up gradation of operating system
  • Due to virus/malware
  • Install any lower version of Windows on pre-installed higher version Windows (dual booting operating system)
One of NTLDR's error is shown below(please see screen shot). It says "NTLDR is missing.. Press Ctrl+Alt+Del to restart."


I tried following solution on few machines and got success. I hope it will help you too. You just need bootable Windows 98 CD and Windows XP CD. First, change boot priority from Hard Disk to CD ROM. Then, insert Windows 98 CD and get command propmt. Just leave as it is and open CD ROM while command propmt. Remove Windows 98 CD and insert Windows XP CD. Now, you just need to copy 2 files from Windows XP CD to your Primary Hard Disk (i.e. C: ). You can use following command lines to copy files. Suppose your main primary partition drive letter is C: and CD ROM drive letter is E:

  • E:\> copy E:\i386\ntldr C:\
  • E:\> copy E:\i386\ntdetect.com C:\
Please change boot priority device before restart your system. I hope this will work. Best of Luck!!!

:)

September 01, 2008

WMS Idle Error on Shutdown

I got a call regarding an error which arrived when they did shutdown their computer. It was WMS Idle error which appeared on Windows shutdown. They did hit end process to shutdown their computer. It wasn't harmful but no one likes this kind of interruption. Well, it was nothing but related with 'nmbgmonitor' which referred to Nero Application. The Nero installed on their computer and it was running while they did shut their computer off. That is was they got an error.

I suggested them to go to start then open run and type msconfig.msc. Its nothing but System Configuration Utility. Please see following screen shot of msconfig.msc.


I told them to kill service named 'NMBGMonitor' under 'Startup' tab of msconfig.msc. Once they made changes the WMS Idle error haven't seen back again. Please see following screen shot.

.

August 16, 2008

Folder Lock


Everybody really want to hide their data from others at office/home. I got lots questions regarding how to lock folder and make it private. I have seen so many same question on Yahoo! Answers too. There was a trick in Win 98 where you customized folder and locked but it was too old. Mostly all people use Windows XP and Windows Vista nowadays. There are many third party software like Folder Guard, Folder Lock, My Secret Folder etc available in market. They lock your personal folder and hide your data from others. But, you need full version of those third party software which does cost to you. Well, I found a cool trick to lock folder and hide your data without third party software. It is nothing but just a .bat (batch) file trick which creates a folder named 'Locker' on same directory when you open .bat file with following text in it. So, if you want to lock your data then open Notepad and type following text or copy|paste then save it with .bat file extension.
___________________________________________________
cls
@ECHO OFF
title Folder Locker
if EXIST "Control Panel.{21EC2020-3AEA-1069-A2DD-08002B30309D}" goto UNLOCK
if NOT EXIST Locker goto MDLOCKER
:CONFIRM
echo Are you sure you want to Lock the folder?(Y/N)
set/p "cho=>"
if %cho%==Y goto LOCK
if %cho%==y goto LOCK
if %cho%==n goto END
if %cho%==N goto END
echo Invalid choice.
goto CONFIRM
:LOCK
ren Locker "Control Panel.{21EC2020-3AEA-1069-A2DD-08002B30309D}"
attrib +h +s "Control Panel.{21EC2020-3AEA-1069-A2DD-08002B30309D}"
echo Folder locked
goto End
:UNLOCK
echo Enter password to Unlock folder
set/p "pass=>"
if NOT %pass%==YOUR PASSWORD HERE goto FAIL
attrib -h -s "Control Panel.{21EC2020-3AEA-1069-A2DD-08002B30309D}"
ren "Control Panel.{21EC2020-3AEA-1069-A2DD-08002B30309D}" Locker
echo Folder Unlocked successfully
goto End
:FAIL
echo Invalid password
goto end
:MDLOCKER
md Locker
echo Locker created successfully
goto End
:End
___________________________________________________

Don't forget to insert a password in place of text 'YOUR PASSWORD HERE'. Then simply run that .bat file. It will create a folder named 'Locker' on first run. (Please see following screen shot)


Once you get 'Locker' folder then save|copy-paste whatever you want to lock|hide from others. in 'Locker' folder. Now again make double click on .bat file. It pop ups a cmd window and ask you 'Are you sure you want to Lock the folder?(Y/N). Just input 'Y' and hit enter. It will lock|hide that 'Locker' folder with data in it. (Please see following screen shot)


Now, you want back your data from it. Just double click on .bat file again and it pop ups a cmd windows with command line 'Enter password to Unlock folder'. Just input your password which you typed in place of YOUR PASSWORD HERE'. It enables to see 'Locker' folder back and you can browse your data. (Please see following screen shot)


If you have trouble to type or copy|paste above coding text in Notepad then visit following link and download Folder Lock easily.

>>> Download Folder Locker here <<<

Advantages:
  • It is absolutely free
  • Just around less than 10 KB of size
  • It works with pen drive too
  • It works with Windows Vista too
Disadvantages:
  • Anyone can see when you enter a password
  • Not reliable like third party folder locker
  • It does not work with few system
Note: If you like posts here then please post your comments here.

August 03, 2008

Display Properties - Windows XP


I post answers on Yahoo! Answers regularly. Recently, I have seen few questions regarding Display properties of Windows XP. You can reach to Display Properties by right click on blank space on Desktop or go to start then click on Control Panel where you can get Display Properties. They asked about Display Properties, disable Screen Saver tab, disable Desktop tab etc. The system Administrator or some modified viruses/maleware are the reason of disable Display Properties and its features. You get following error message when your Display Properties disable by any reason(see screen shot).


It is nothing but just a registry trick. You can yourself make it enable or disable as per your requirements.

Enable Diplay Properties:
Type following text in notepad or copy-paste it and save it with .reg extension. Then simply run/merge it. It will Enable Display Properties.

Windows Registry Editor Version 5.00

[HKEY_CURRENT_USER\Software\Microsoft\Windows\CurrentVersion\Policies\system]
"NoDispCPL"=dword:00000000

[HKEY_LOCAL_MACHINE\Software\Microsoft\Windows\CurrentVersion\Policies\system]
"NoDispCPL"=dword:00000000


Disable Diplay Properties:

Type following text in notepad or copy-paste it and save it with .reg extension. Then simply run/merge it. It will Disable Display Properties.

Windows Registry Editor Version 5.00

[HKEY_CURRENT_USER\Software\Microsoft\Windows\CurrentVersion\Policies\system]
"NoDispCPL"=dword:00000001

[HKEY_LOCAL_MACHINE\Software\Microsoft\Windows\CurrentVersion\Policies\system]
"NoDispCPL"=dword:00000001


Enable Appearance tab:

Type following text in notepad or copy-paste it and save it with .reg extension. Then simply run/merge it. It will Enable Appearance (ie.Themes+Appearance) tab in Display Properties window.

Windows Registry Editor Version 5.00

[HKEY_CURRENT_USER\Software\Microsoft\Windows\CurrentVersion\Policies\system]
"NoDispAppearancePage"=dword:00000000

[HKEY_LOCAL_MACHINE\Software\Microsoft\Windows\CurrentVersion\Policies\system]
"NoDispAppearancePage"=dword:00000000


Disable Appearance tab:

Type following text in notepad or copy-paste it and save it with .reg extension. Then simply run/merge it. It will Disable Appearance (ie.Themes+Appearance) tab in Display Properties window.

Windows Registry Editor Version 5.00

[HKEY_CURRENT_USER\Software\Microsoft\Windows\CurrentVersion\Policies\system]
"NoDispAppearancePage"=dword:00000001

[HKEY_LOCAL_MACHINE\Software\Microsoft\Windows\CurrentVersion\Policies\system]
"NoDispAppearancePage"=dword:00000001


Enable Desktop tab:

Type following text in notepad or copy-paste it and save it with .reg extension. Then simply run/merge it. It will Enable Desktop tab in Display Properties window.

Windows Registry Editor Version 5.00

[HKEY_CURRENT_USER\Software\Microsoft\Windows\CurrentVersion\Policies\system]
"NoDispBackgroundPage"=dword:00000000

[HKEY_LOCAL_MACHINE\Software\Microsoft\Windows\CurrentVersion\Policies\system]
"NoDispBackgroundPage"=dword:00000000


Disble Desktop tab:
Type following text in notepad or copy-paste it and save it with .reg extension. Then simply run/merge it. It will Disable Desktop tab in Display Properties window.

Windows Registry Editor Version 5.00

[HKEY_CURRENT_USER\Software\Microsoft\Windows\CurrentVersion\Policies\system]
"NoDispBackgroundPage"=dword:00000001

[HKEY_LOCAL_MACHINE\Software\Microsoft\Windows\CurrentVersion\Policies\system]
"NoDispBackgroundPage"=dword:00000001


Enable Screen Saver tab:

Type following text in notepad or copy-paste it and save it with .reg extension. Then simply run/merge it. It will Enable Screen Saver tab in Display Properties window.

Windows Registry Editor Version 5.00

[HKEY_CURRENT_USER\Software\Microsoft\Windows\CurrentVersion\Policies\system]
"NoDispScrSavPage"=dword:00000000

[HKEY_LOCAL_MACHINE\Software\Microsoft\Windows\CurrentVersion\Policies\system]
"NoDispScrSavPage"=dword:00000000


Disable Screen Saver tab:
Type following text in notepad or copy-paste it and save it with .reg extension. Then simply run/merge it. It will Disable Screen Saver tab in Display Properties window.

Windows Registry Editor Version 5.00

[HKEY_CURRENT_USER\Software\Microsoft\Windows\CurrentVersion\Policies\system]
"NoDispScrSavPage"=dword:00000001

[HKEY_LOCAL_MACHINE\Software\Microsoft\Windows\CurrentVersion\Policies\system]
"NoDispScrSavPage"=dword:00000001


Enable Settings tab:

Type following text in notepad or copy-paste it and save it with .reg extension. Then simply run/merge it. It will Enable Settings tab in Display Properties window.

Windows Registry Editor Version 5.00

[HKEY_CURRENT_USER\Software\Microsoft\Windows\CurrentVersion\Policies\system]
"NoDispSettingsPage"=dword:00000000

[HKEY_LOCAL_MACHINE\Software\Microsoft\Windows\CurrentVersion\Policies\system]
"NoDispSettingsPage"=dword:00000000


Disble Settings tab:
Type following text in notepad or copy-paste it and save it with .reg extension. Then simply run/merge it. It will Disable Settings tab in Display Properties window.

Windows Registry Editor Version 5.00

[HKEY_CURRENT_USER\Software\Microsoft\Windows\CurrentVersion\Policies\system]
"NoDispSettingsPage"=dword:00000001

[HKEY_LOCAL_MACHINE\Software\Microsoft\Windows\CurrentVersion\Policies\system]
"NoDispSettingsPage"=dword:00000001


.

July 25, 2008

Restore Recycle Bin


I posted an article on Recycle Bin-Windows XP on dated 20th November, 2007. People appreciated this article but they asked me how to enable/disable Recycle Bin in Windows XP. I got question regarding Restore disabled Recycle Bin in Windows XP. I forgot to write on this issue. Now, here I am for how to Restore Recycle Bin in Windows XP.

As usual it is just Registry trick. You can do yourself with following details.


Recycle Bin Enable:
Type following text in notepad or copy-paste it. Then run/merge it. It will Enable Recycle Bin.

Windows Registry Editor Version 5.00

[HKEY_CURRENT_USER\Software\Microsoft\Windows\CurrentVersion\Explorer\HideDesktopIcons\NewStartPanel]
"{645FF040-5081-101B-9F08-00AA002F954E}"=dword:00000000


Recycle Bin Disable:
Type following text in notepad or copy-paste it. Then run/merge it. It will Disable Recycle Bin.

Windows Registry Editor Version 5.00

[HKEY_CURRENT_USER\Software\Microsoft\Windows\CurrentVersion\Explorer\HideDesktopIcons\NewStartPanel]
"{645FF040-5081-101B-9F08-00AA002F954E}"=dword:00000001


Note: This trick works with Windows Vista too. Please try this one with Windows Vista.
.

June 08, 2008

Add-Remove Programs Enable-Disable


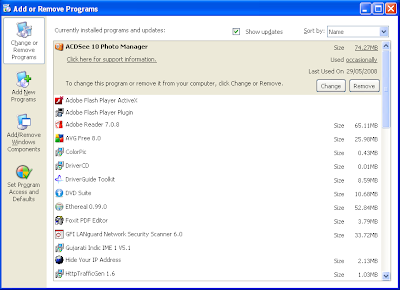
Add or Remove Programs is the most important options for computer system. You can reach it through Start>Settings>Control Panel or Start>Run>type 'appwiz.cpl'. It has following inbuilt options.

(1) Change or Remove Programs
(2) Add New Programs
(3) Add/Remove Windows Components


The system Administrators may disable it for security reason like whole Control Panel. Few malicious software are also capable to edit Registry and make Add or Remove Programs disable which displays following error message(check screen shot).


You can also Enable/Disable the Add or Remove Programs in Control Panel settings with following steps.

Disable Add or Remove Programs:
Type following text in notepad or copy-paste it and run/merge it. It will Disable Control Panel.

Windows Registry Editor Version 5.00

[HKEY_CURRENT_USER\SOFTWARE\Microsoft\Windows\ CurrentVersion\policies\Uninstall]
"NoAddRemovePrograms"=dword:00000001


[HKEY_LOCAL_MACHINE\SOFTWARE\Microsoft\Windows\ CurrentVersion\policies\Uninstall]
"NoAddRemovePrograms"=dword:00000001


Enable Add or Remove Programs:
Type following text in notepad or copy-paste it and run/merge it. It will Enable Control Panel.

Windows Registry Editor Version 5.00

[HKEY_CURRENT_USER\SOFTWARE\Microsoft\Windows\ CurrentVersion\policies\Uninstall]
"NoAddRemovePrograms"=
dword:00000000

[HKEY_LOCAL_MACHINE\SOFTWARE\Microsoft\Windows\ CurrentVersion\policies\Uninstall]
"NoAddRemovePrograms"=dword:00000000

February 04, 2008

Legal Notice Caption - Windows

This is a good trick which runs before logon to Windows. It works with all Windows. It displays a message window before logon. You can yourself create a Legal Caption for your computer system. Go to Start-> Run command. Then open Registry Editor with help of 'regedit'.

Find the appropriate key for your operating system.

Windows 95, 98 and Me:
HKEY_LOCAL_MACHINE\SOFTWARE\Microsoft\ Windows\CurrentVersion\Winlogon

Windows NT, 2000 and XP:
HKEY_LOCAL_MACHINE\SOFTWARE\Microsoft\ WindowsNT\CurrentVersion\Winlogon

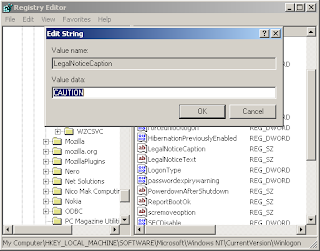
Create/modify a string value(REG_SZ) named 'LegalNoticeCaption' and type the text you want to appear in the legal notice windows title bar. (e.g. 'CAUTION')


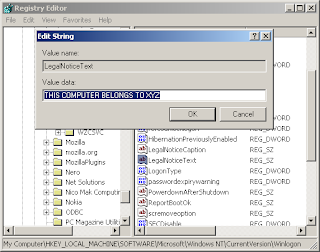
Create/modify a string value(REG_SZ) named 'LegalNoticeText' and type the text you want to appear as message body. (e.g. 'THIS COMPUTER BELONGS TO MR. XYZ')


Restart your computer and you will get to see a Legal Notice dialog box window before logon to Windows. Please refer real screen shots for help.

December 26, 2007

Taskbar - Windows


It is the bar which is located on bottom of the Desktop screen. It is used to launch and monitor applications in Microsoft Windows. It contains Start menu, Quick Launch bar, System Tray, Display Running Tasks, etc. You can modify Taskbar as per your requirement.


I got a call for trouble regarding Taskbar. That machine didn't display running tasks in Taskbar area. I found that machine infected from viruses/worms. The viruses/worms might be edited that machine's Registry and made running tasks disable/hidden. I tried a lot to make it default. But, it didn't work. Ultimately, I found a .vbs script for same trouble. I downloaded that script and run it. It solved trouble and that machine's Taskbar worked normal as it before. You can download this magical script from following link.


If you don't able to download said script then just email me. I will send this script to you.

December 03, 2007

Internet Options - Enable/Disable


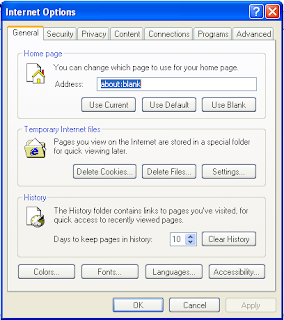
Suppose you work at a place where you share your computer with others. They don't know much more about computer /Internet and every time they change IE's Internet settings which is best for in use. You can stop anyone to alter Internet settings by disable Internet Options under Tools menu. It is quite easy trick. As usual, you just need modify Registry.

Internet Options - Disable:
Type following text in notepad or copy-paste it and run/merge it. It will Disable Internet Options.

Windows Registry Editor Version 5.00

[HKEY_CURRENT_USER\Software\Policies\Microsoft\Internet Explorer\Restrictions]
"NoBrowserOptions"=dword:00000001

[HKEY_LOCAL_MACHINE\SOFTWARE\Policies\Microsoft\Internet Explorer\Restrictions]
"NoBrowserOptions"=dword:00000001


Internet Options - Enable:
Type following text in notepad or copy-paste it and run/merge it. It will Enable Internet Options.

Windows Registry Editor Version 5.00

[HKEY_CURRENT_USER\Software\Policies\Microsoft\Internet Explorer\Restrictions]
"NoBrowserOptions"=dword:00000000

[HKEY_LOCAL_MACHINE\SOFTWARE\Policies\Microsoft\Internet Explorer\Restrictions]
"NoBrowserOptions"=dword:00000000

>>> Download IE Enable Registry File here <<<

Note: This trick works with Windows Vista too. Please try to compatibility.
.

November 21, 2007

Bootskin Trick

This is a good trick to fool your friend/colleague. It is regarding display a Boot Screen whick looks like 'Hard Disk Formating' alert. So, it will fool easily. You just need to install Bootskin software which is absolutely free from its site-> http://www.stardock.com/products/bootskin/ Please refer following real screen shot of this software.


Then you need to download 'Formating Boot Screen' from same site and install it with help of above said software-> http://www.wincustomize.com/skins.aspx?skinid=1292&libid=32 So, when your friend or colleague will restart his/her system then he/she will find that his/her computer's hard drive is being formatted. Only you know that it is a Trick/Prank. I am sure he/she will shocked and try to restart his/her machine again and again. But it won't stop display that Boot Screen until remove it. As per Boot Screen help, you will not stop previewing it until you click on its window anywhere. But, I have found that it doesn't work to click on its window and stop previewing it. So, I have used 'Safe Mode' and remove it. Please refer real screen shot of said 'Formating Boot Screen'.


Disclaimer: This is complicated trick so please be careful while using it. I am not liable for anything happen to your computer.

November 20, 2007

Recycle Bin - Windows XP


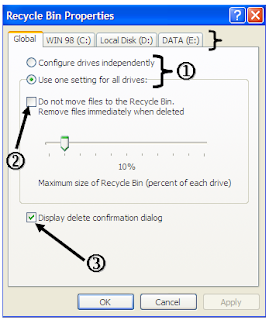
I have noticed that people don't really know more about Recycle Bin. Recycle Bin has few good facility. You can configure it as per your need. I have described them here. Make right click on Recycle Bin and reach to properties. You will get a window.

(1) From this option you can set space/size of deleted files on your Hard Disk. You can set up single settings for all Drives ( all partitions ) or you can set it up independent settings for each partition. (Check Arrow No:1)

(2) If you are skilled person in computer then you can enable this settings. It doesn't move files to Recycle Bin. It deletes them directly. It is harmful if you don't sure whether you want to delete or not. (Check Arrow No:2)

(3) When you delete file/s from your computer you will get delete confirmation dialog box. It is sometimes boring to always hit 'Yes' button on this dialog box. So, if you can set up this option it will never display delete confirmation box. It will delete and move your file/s quick to Recycle Bin. (Check Arrow No:3)

Please check following real screen shot of above explained options.


November 14, 2007

HIBERNATE

To spend the winter in a sleep like condition of partial or total inactive. Many insects, most reptiles and amphibians, and some mammals hibernate. In computer definition, Hibernate is a feature where the contents of RAM is written on Hard Disk before powering off the system. It is also known as sleep mode. To use Hibernation the hard disk needs to have at least as much free space as there is RAM on the system. It means if you have 256MB RAM then you need at least 256MB free space on Hard Disk for Hibernate. It is good inbuilt feature with many operating systems like Windows, Mac OS, and Linux. You can also enable this feature in Windows XP as per following simple steps.
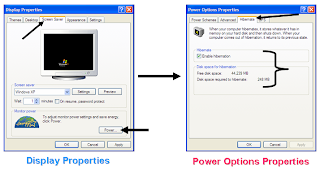
  • Go to Display properties of Windows XP through Control Panel or via right click on Desktop
  • Then go to Screen Saver tab and click on Power options
  • Now go to Hibernate tab on Power Options Properties window
  • Then select Hibernate option and apply it
Please refer following screen shot of above steps so you can understand easily.


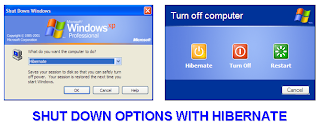
The Shut Down screen will be changed after enabling Hibernate. You will get Hibernate options on your Shut Down screen and your Shut Down screen looks like following.


Advantages:
  • Fast power off than normal Shut Down
  • You can Hibernate your computer any time and you really don't need to close any opened programs, you can leave them as it is
  • Quick restart : it restarts so quicker than hard reboot, plus you will get all opened programs exact which you left open when you hibernated
  • Password protection
  • Save electricity
Hibernate Shortcut:
  • Make right click on Desktop.
  • Then choose New->Shortcut.
  • Type rundll32.exe PowrProf.dll, SetSuspendState in location of command
  • Click Next
  • Give this shortcut name if you want
  • Click finish
  • So, next time when you want to Hibernate just double click on this shortcut

September 15, 2007

Set "Edit" as default Action


You always get a lot files from internet or other sources. If they are in .vbs or .reg extension and you make double click on them then they will simply modify your settings which may be harmful because you have “open” or "Merge" as default action. You don’t have chance to check on it. There is a trick where you can set “Edit” as your default action so when you make double click on .vbs or .reg extension files, they will open in edit view. So, you can check what is story inside those files and then you can open them with help of right click.


Copy-paste following text in notepad and save it with .reg extension. Then just merge/run it.

For .reg file extension:

Windows Registry Editor Version 5.00

[HKEY_CLASSES_ROOT\regfile\Shell]
@="Edit"

For .vbs file extension:

Windows Registry Editor Version 5.00

[HKEY_CLASSES_ROOT\VBSFile\Shell]
@="Edit"


September 09, 2007

Administrator Account in Windows XP


In every installation of Windows XP, there are built-in and default accounts like Guest, HelpAssistant and Administrator. The Administrator account is equivalent to super user. If you have set up another user account in Windows XP as Administrator then default Administrator account will be hidden and invisible.

Unhide Administrator Account:

To see the Administrator account, you have to boot the Windows in Safe Mode or you can modify the Windows registry so that the Administrator account will be shown at Windows Welcome screen.

  • Launch Registry Editor.
  • Navigate to HKEY_LOCAL_MACHINE\SOFTWARE\Microsoft\ WindowsNT\CurrentVersion\Winlogon\SpecialAccounts \UserList in the Registry Editor.
  • Double-click the Administrator key in the right pane.
  • If the Administrator key doesn’t exist, right-click on the above tree in the pane, choose New, DWORD Value, name it Administrator.
  • Type 1 in the “Value data” box for unhide Administrator account. (set 0 to make Administrator hidden)

On the next boot, the Administrator account will be visible on the Welcome screen, along with all of the computer’s user accounts.

Back door login through default Administrator account:

Suppose you’ve an account with administrator rights and assigned a Password for same but, you missed/forgot its Password or there is a computer with Password protected user account and you want unauthorized login on same. Then just boot that computer and wait Windows XP welcome login screen. Now just hit Ctrl+Alt+Del twice and you will get a new window named “Log on to Windows” with Username and Password option. Type ‘Administrator’ as Username and leave blank as Password and hit enter. You can log on to anyone’s Password protected computer with this trick.

Change Password without knowing old password:

You can make fool/worry to your friend through this trick. Suppose you’re logged in your friend’s computer with his/her Password protected account which Password is hidden for you and you don’t know real Password. Just make a trick to erase or reset that Password with following simple steps in MS-DOS prompt.

Open Windows command prompt then type “net user (account name) *” without quotation marks then hit enter key. It will ask ‘Type a password for the user’ leave it blank or type a new Password then press enter. It will ask ‘Retype the password to confirm’, just repeat what you typed as ‘Type a password for the user’ and hit enter key. Well, you can successfully change Password with this trick without knowing old password. Please refer following real screen shot.


September 06, 2007

Add "Copy to" & "Move to" on Right Click(WinXP)


It is hard to move or copy a file/s or folder/s to specific location. There is a option called "Send to" on context menu but it has some limitation. You can send content through it just few locations like.. My Documents, Floppy Disk etc. If You can add "Copy to" and "Move to" options on Right click(context menu) then it will increase your file/folder transfer facility. You can Copy and Move your content anywhere on your machine through Right click(context menu). I have described a registry trick following here.

Copy-paste following text in notepad and save it with .reg extension. Then just merge/run it. You will get 2 new options on your Right click(context menu).


Windows Registry Editor Version 5.00

[HKEY_CLASSES_ROOT\AllFilesystemObjects\shellex \ContextMenuHandlers]

[HKEY_CLASSES_ROOT\AllFilesystemObjects\shellex \ContextMenuHandlers\Copy To] @="{C2FBB630-2971-11D1-A18C-00C04FD75D13}"

[HKEY_CLASSES_ROOT\AllFilesystemObjects\shellex \ContextMenuHandlers\Move To] @="{C2FBB631-2971-11D1-A18C-00C04FD75D13}"

August 31, 2007

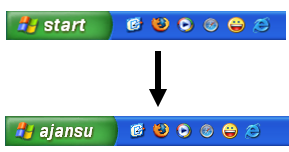
Change “start” button text (Win XP)


It is good trick to change Windows “start” button text. So many people already posted it so I didn't interested in it but I got few mails regarding this. So, I thought to publish this trick on my blog too. It is little harmful to edit explorer.exe. So, please be careful while using this trick on your machine. I am not liable for any damage in your computer.

Step 1:

In this entire process, first you need free software named Resource Hacker ™. It is a freeware resource files (*.res). Go to your windows folder and find explorer.exe (C:\Windows\explorer.exe). Make a backup copy of explorer.exe and store it anywhere in same or other partition. utility to view, modify, rename, add, delete and extract resources in 32bit Windows executables and

Step 2:

Now start Resource Hacker ™ and open explorer.exe from C:\Windows. You can see Left and Right pane are there. Go to Left pane and Expand ‘String Table’ utility by click on plus sign. If you’re using XP theme then expand ‘37’ and then click on ‘1033’ or if you’re using Classic theme then expand use ‘38’. When you click on ‘1033’, you’ll get to see some scripting text in Right pane. There’s an item no: 578 with showing ‘start’ text between double quotation marks. You just need to type whatever you want to display in place of ‘start’, between those quotes. When you edit this text there is a button named ‘Compile script’ will activate. Now just click on ‘Compile script’ and then save this project as ‘explorer_new.exe’ in C:\Windows folder. Please refer following screen shots.

Step 3:

Now, you have to make some changes in your registry and tell to computer to use new ‘explorer_new.exe’ instead of older ‘explorer.exe’. For it, just open notepad and type following text or copy-paste and save it with .reg extension. Now, simply run/merge it with double click on it.

Windows Registry Editor Version 5.00

[HKEY_LOCAL_MACHINE\SOFTWARE\Microsoft\WindowsNT \CurrentVersion\Winlogon]

"Shell"="explorer_new.exe"

Then restart your computer and see Magic!!


August 28, 2007

Defragmentation of Hard Disk

I visited and checked few computers. They didn't infect by virus, worms but they had troubled restarting. I examined and then cleaned some useless files and folders. At the end, I used Disk Defragmentation utility and cured it. So, Defragmentation is useful utility for disk management.

Disk Defragmentation: The process or reorganizing and rewriting files so that they occupy one large continuous area on your hard disk rather than several smaller areas its called defragmentation.


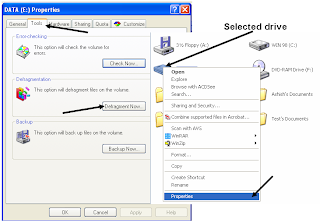
Just go to your hard disk and make a right click. Then click on 'Properties' and get a 'Disk Properties' window. Go to 'Tools' tab and select "Defragment Now" option.(Check real screen shot above)

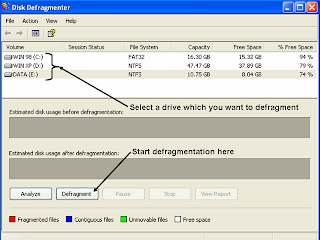
Then you'll get a new window named "Disk Defragmenter" as like below screen shot. Select a drive which you want to defragment then hit "Defragment" button at bottom and wait because it will take several minutes.


August 25, 2007

Disable Error Reporting (Win XP)

Whenever you forcefully kill some running services then Windows XP displays a dialog box called Error Reporting. If you choose 'Send Error Report' , it will report to Microsoft with entire details of your computer. Suppose you don't want to send it and you're well-aware about it so you go with 'Don't Send' but what about other people who shares your computer and don't know much more and select 'Send Error Report'.

Well, you can stop to display this dialog box easily. Just go to My Computer icon then make a right click, select 'Properties and reach to 'Advanced' tab. Just go to end of it and select 'Error Reporting' from where you can disable Error Reporting so easily. Please check real screen shots with this post.